Resources
If you’ve made it here, you’ve found the right spot for learning how to record/produce vocals. By the way, honestly, the stock plugins that come with your DAW are pretty sweet. I wouldn’t recommend buying plugins unless you really feel the need. This is my starting point for learning to record/produce vocals, so I’m putting a good amount of tips in here.
Recording always comes first
No matter what kind of vocal chain you add, you can’t salvage bad vocals. Make sure the recording is near perfect without any effects, and then you can start to add them in! If you can’t hear what’s really going on, you might as well not even bother. Following the Pareto principle, a good vocal is 80% recording and 20% mixing.
Keep the positioning and distance from your mic consistent. Mic choice combined with mic position is 80% of your vocal sound. Skip over either of these steps, and your vocal is going to be a lot harder to mix.
Personally, I use a dynamic mic, the Shure SM57. These mics are designed to be used up close. Dynamic mics reject more background noise, so they’re great if you are in a particularly bad sounding room. Rule of thumb is to speaking/sing into the mic a fist away. Also, you do not need phantom power for dynamic mics. If you are using phantom power in a condenser mic, make sure to turn it off before unplugging the mic. Finally, You’ll definitely need a pop filter to get rid of plosives.
Speaking of removing plosives, if the pop filter isn’t doing the job try not talking directly into the mic. Try singing at it in a 30 degree angle and sing “past” the mic. It’s a little different sound than singing straight into it. But, this angle takes the edge off and reduces plosives while keeping the sound more faithful than greater angles. You can also put a sock (regular ankle cut) on your mic.
When I record, I use the 3rd Gen Scarlett Solo interface. You should aim for your vocals to come through all green on the interface itself. Yellow is fine, but red on the interface means you’re clipping. You should aim so your loudest vocal hits around the -6dB mark. This actually applies to most instruments too. This allows for headroom in your mix. Too low, and you won’t get any valuable information. Too high, and your tracks will be clipping and distorted.
In addition to the 3rd Gen Scarlett Solo interface, I use a Cloudlifter CL-1. This is because I use a dynamic microphone, the SM57. It needs a lot of gain. The first point of amplification is the most crucial, so the Cloudlifter made perfect sense for the best signal/noise ratio. Without it, I have to crank the gain knob very high on the Scarlett Solo since the pre-amps aren’t particularly strong. This mitigates that and gives me a clean signal. All you do is connect your passive mic to the input and connect the output to a mixer, interface, or preamp with +48v phantom power engaged. The Cloudlifter does the rest!
Then, in Logic, I set low latency monitoring mode on. After, I’ll set the I/O buffer size to 64 samples. After, I set it back to 256 samples to save on CPU when I’m not recording.
- By the way, keep your hands off the mic!
- Recording to a click track is optional; honestly, it might be better to record with just the music!
Editing
For editing, we want to go with our best takes and put them together. This is totally normal for pop songs, and some may even do different takes for each word. You can skip this if you want to keep the original performance. Personally, I split them up by phrases, but it depends.
Once you’re happy with all the takes, you need to check for clicks/pops and apply crossfades to mitigate them. Add a short crossfade between the clips of about 5 to 15ms.
If there’s any background noise between phrases, you can simply cut this out. Some people like to cut out the breaths, but I think this completely ruins the emotion of the performance. My advice is to leave the breaths in.
You can also go through and fix any timing issues. If a phrase comes in a little early or late – move it into place with the “Nudge Value” tool.
Targeting the hardest parts first
According to Charlie Puth, from their video on getting your vocals production ready, we should target the hardest vocals first and split up the hardest parts. For example, if you have to do an octave jump “hopes up,” split it into “hopes” and “up” and record them separately. Sing the “up” a little bit so you can connect it in the software in the “hopes” part. Blend/combine them with crossfades.
Vocal Chain
I create the vocal chain in the order below. Like, we want to EQ before compressing because we don’t want the compressor bringing out frequencies we don’t want. Your vocal chain really will depend on what genre you’re in and what you’re trying to achieve.
Btw, right now, my vocal chain is just Logic’s “Warm Vocal” or sometimes “Natural Vocal” plus custom pitch correction and reverb. I’m still working on it.
Removing Plosives
Keep in mind, as mentioned above, this should be done first after recording without any effects and before any mixing is done. If there are already effects on your vocal, bypass them before trying to remove plosives.
Normally with your pop filter, you shouldn’t have harsh plosives. There are other ways to mitigate harsh plosives like angling the mic or increasing the distance from it. But, that may alter the tone and sometimes you can’t avoid being up close if you’re using a dynamic mic. If you do end up having plosives, we do have some tricks to deal with them.
We’ll use the marquee tool to select the region where the plosive is happening. We’ll want to be a bit generous with the selection because we’ll have to crossfade and blend it back in. After you’ve made your selection, click on it to separate. You’ll want to do a high pass EQ filter on that region. Set the cycle on that region by using the “Set Locators” function in the toolbar menu. Then, listen as you set the high pass filter. For a general starting point, apply a 150Hz 48 dB/Oct pass on the lows. Then, we bounce the selection with source as “leave” and the destination as “new track” and check to include the volume levels. Normalize should be off. Leave everything else unchecked.
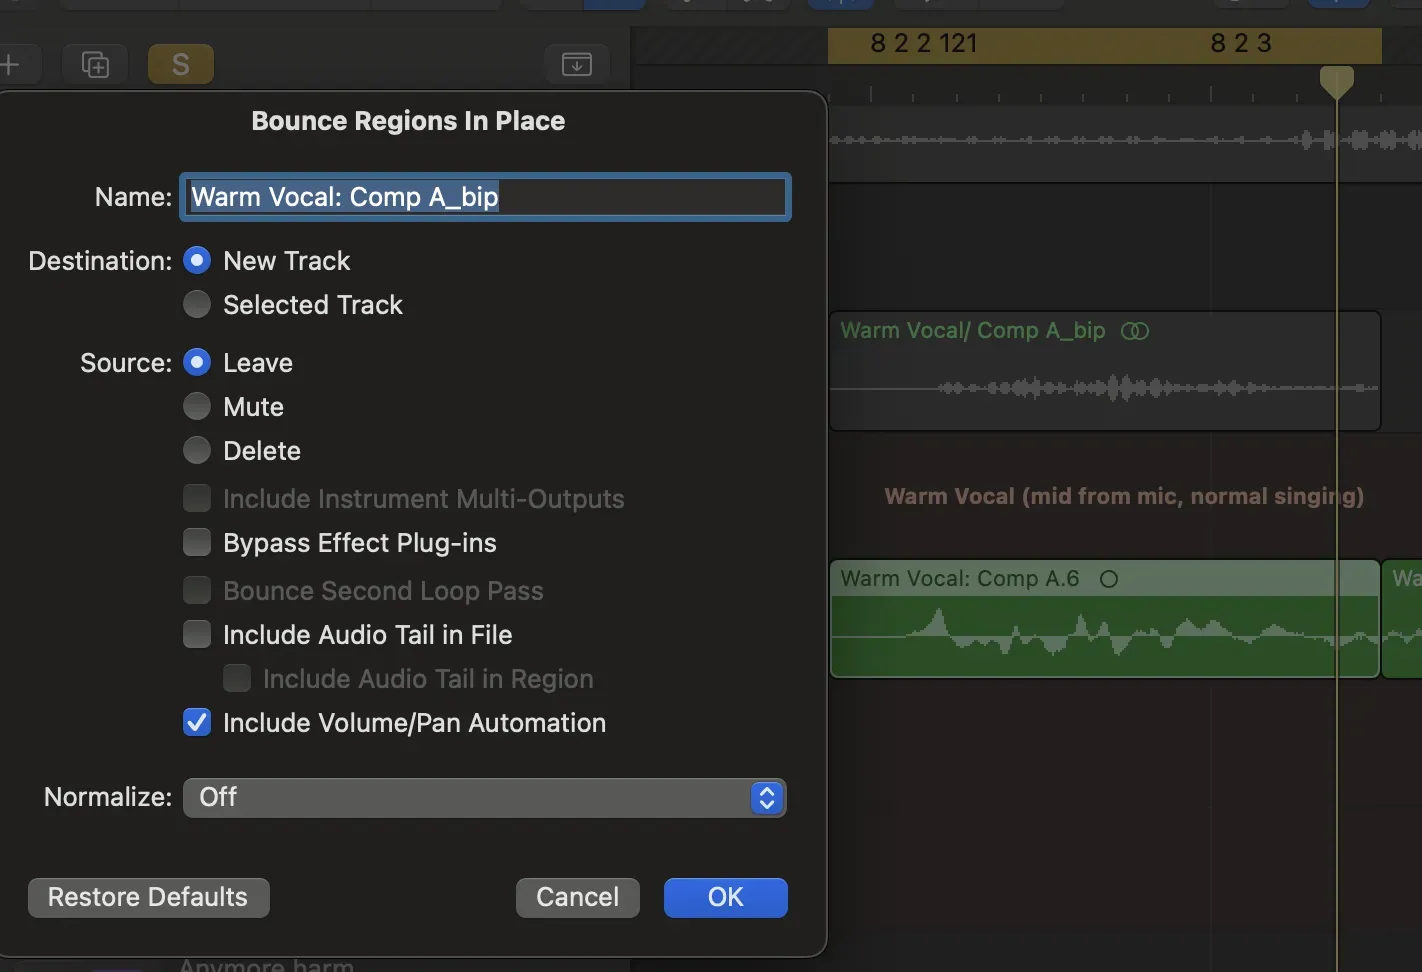
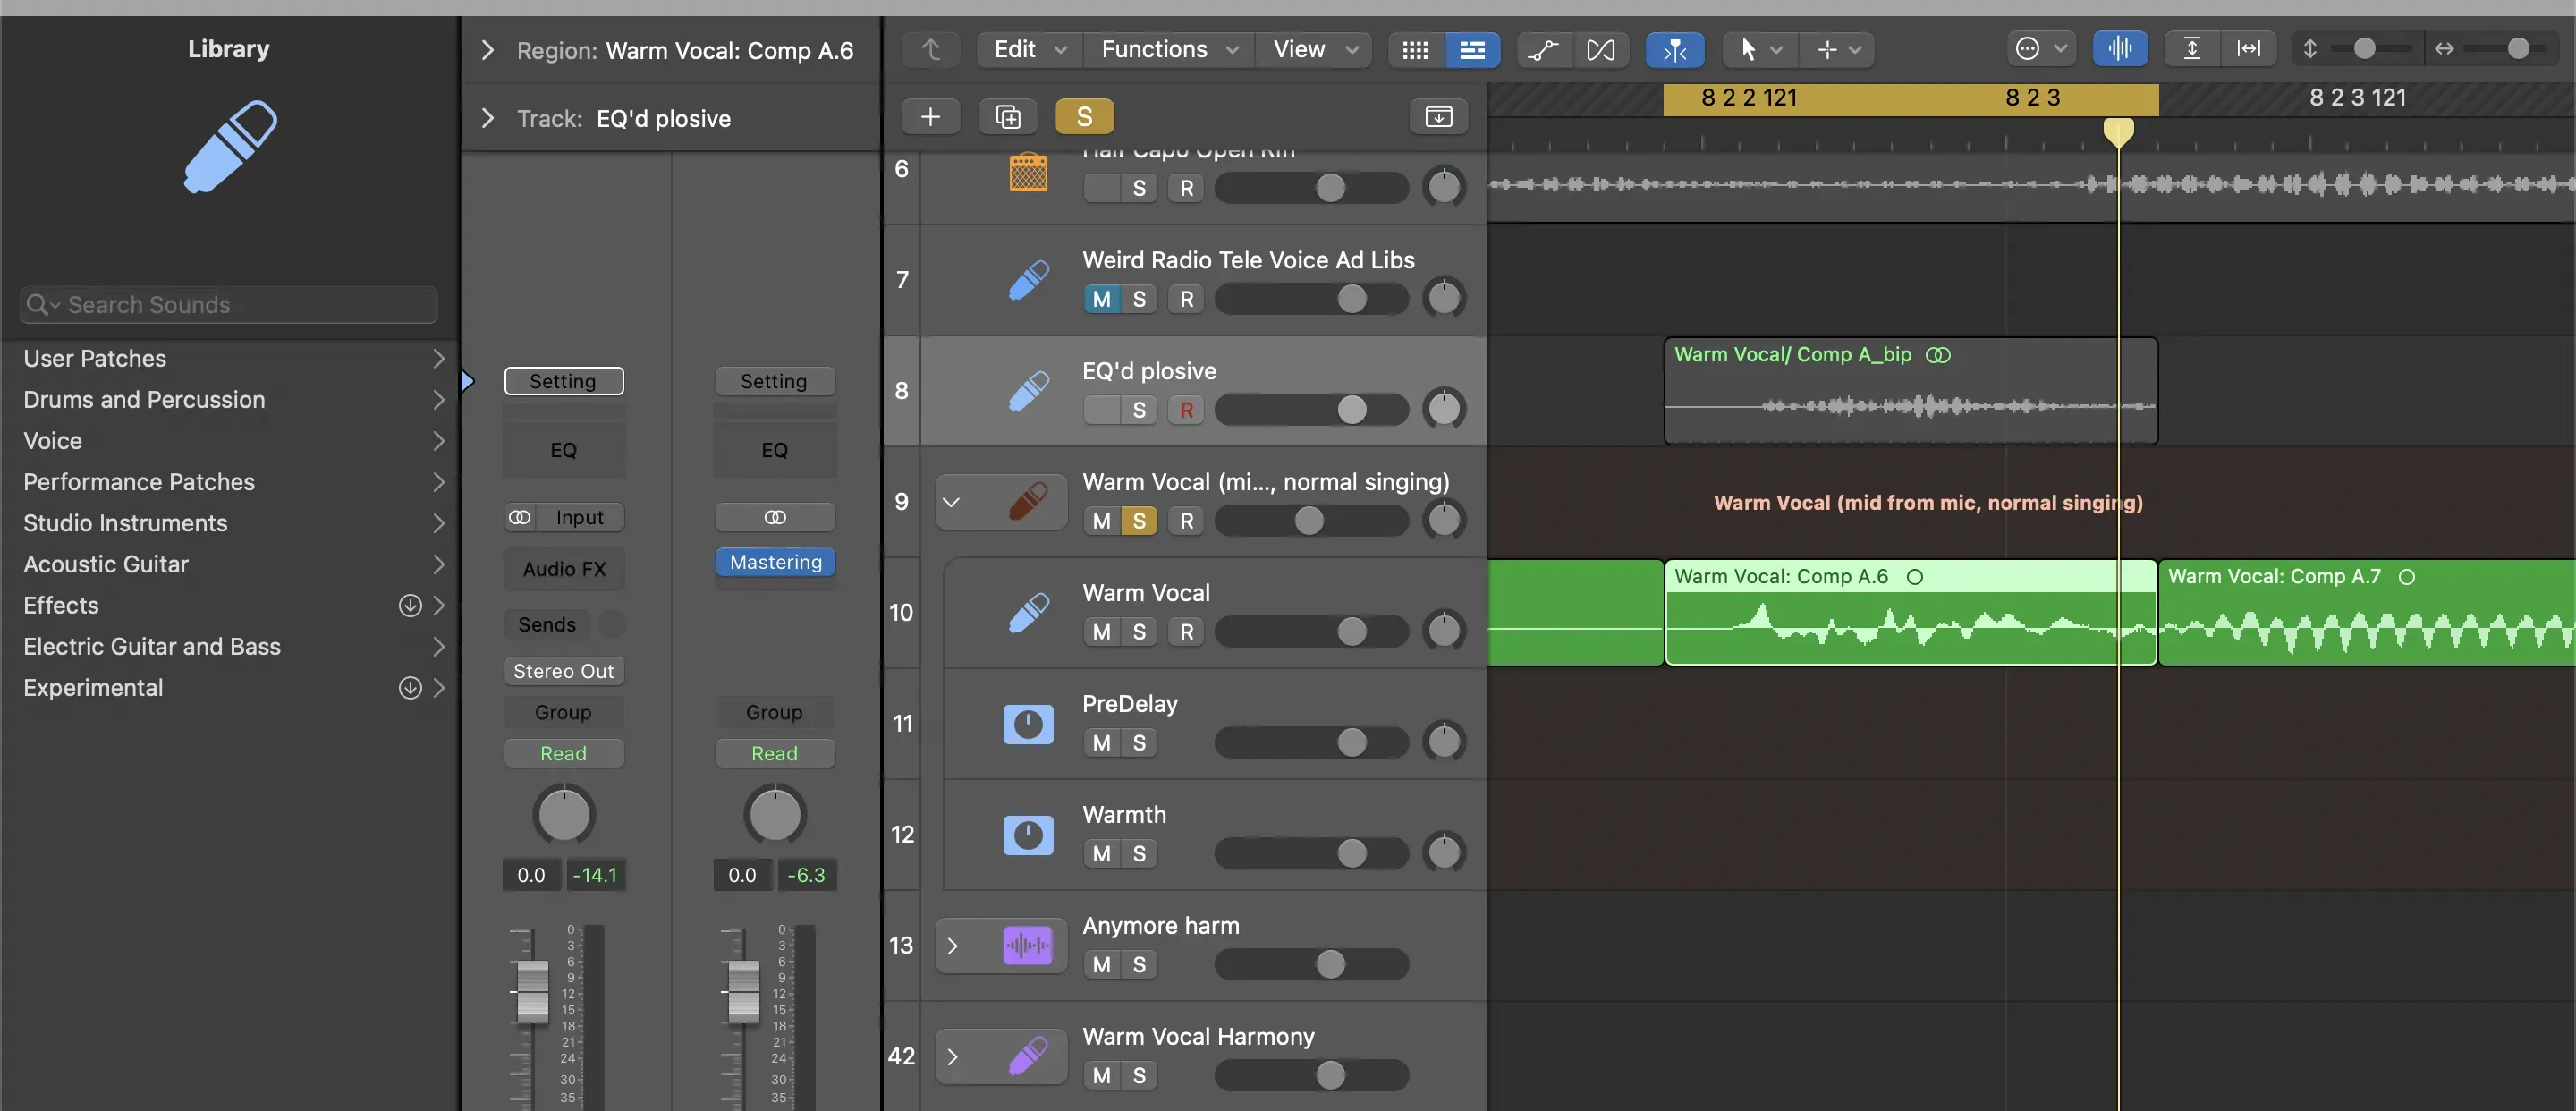
After bouncing to a new track, you should see there’s no longer huge peaks in our waveform after EQ’ing it. Delete the old section, pull the newly EQ’d section in its place. Then, take the regions adjacent to it and apply a subtle crossfade. The final step would just be joining the clips back together.
Noise Gate
This is optional, and personally, I don’t use one. But, you do want to take out the sounds of lip smacking/unwanted noises. I usually get this done w/ the remove silence tool across the phrases I find unwanted noises in.
A noise gate automatically mutes or reduces the volume of audio signals below a certain threshold, helping to eliminate unwanted background noise or hum during quiet passages. Keep in mind, noise gates can’t get rid of all background noise. If there’s background noise during the vocal phrase, you won’t be able to get rid of it.
You play it by ear to make sure it works and isn’t cutting the vocal too short. But, the noise gate will remove any spillage from after you’re done singing.
- Threshold: at what signal level the gate opens and closes
- Hold: How long it stays open
- Attack: How fast it opens
- Release: How fast it closes
- Lookahead: tells the gate to do everything
Nms in advance by looking ahead to see how loud the instrument/vocal is going to be later. The gate can know ahead of time that it’ll need to open up. Then it’s less likely to chop off the beginning of a sound. You only need a few ms because it’ll stress the CPU. - Hysteresis: If the threshold is at -15db and the hysteresis is at -5db, the gate will open at any audio signal louder than -15db and only close when it falls below -20db. Turns the threshold into a range instead of a single number.
- Reduction: Amount of volume the audio signal is reduced by if it falls below the threshold.
Small excerpt on Vocal EQ
Personally, I don’t mind the stock EQs from Logic’s preset libraries.
Compression
A compressor reduces the dynamic range of an audio signal by reducing the loud parts and boosting the quiet ones, resulting in a more controlled and balanced sound. Our ears don’t like recordings with too many loud and soft parts all throughout the recording.
For compression, I will probably do a whole separate post on this. I really like Logic’s “Warm Vocal” and “Natural Vocal” stock plugins and what they come with. The only small tweak I’ve done so far is changing the “Natural Vocal” compressor to the “Vintage Medium” setting.
Pitch correction
After putting together all the best takes, there can still be imperfections. Keep in mind, imperfections aren’t always a bad thing - they can add raw emotion and energy.
When doing pitch correction, you could either manually correct notes with “Flex Pitch” or use Logic’s “Pitch Correction” plugin on the whole track. “Flex Pitch” can take more time, but it allows you to be more precise so the results could be worth it. With “Flex Pitch,” you can also revert it back to the original vocal after editing it by right-clicking the background of the selected region and “Set all to Original Pitch.” “Pitch Correction” is easier to apply, but could work against you if it pulls a note in the wrong direction.
Personally, I’ve seen very good results with both. Basically, I make sure I get a near-perfect vocal take and then the plugin/flex pitch will help taper anything out of tolerance.
Flex Pitch
This is what the manual “Flex Pitch” looks like in the editor window:
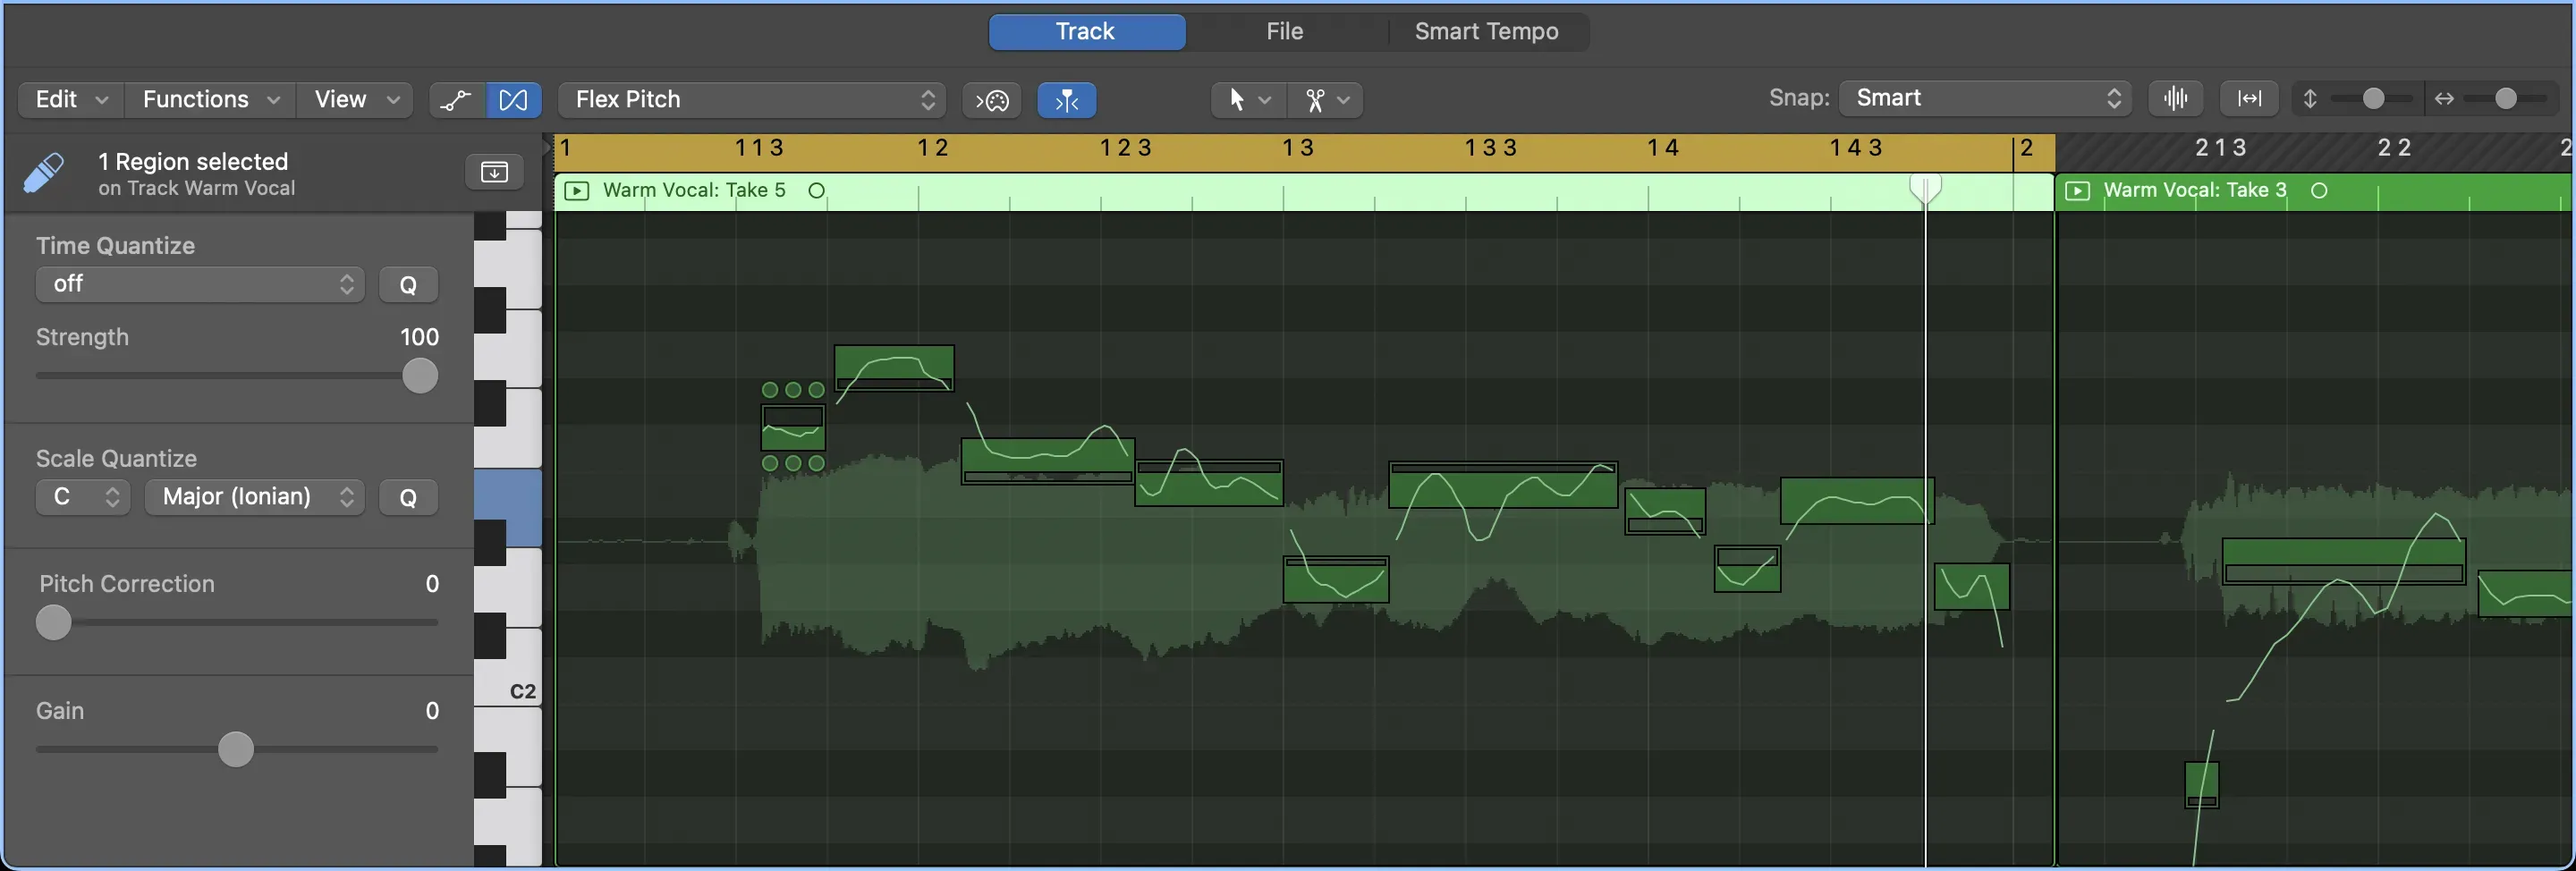
The scissor tool will be your best friend in this. You can chop up the areas where you are N cents off the note within the scale you’re trying to fit in and can pitch-shift it. Note, it will tell you the average amount it’s off so but you can tell with the lines where you were going off pitch.
For pitch, typically anywhere between 8 and -8 cents off is acceptable. But, sometimes you can get some popping/clicking when doing this and shifting cut parts up. This is the downfall of using this technique, but I’ve heard this rarely happens. You can try making minor adjustments to adjacent notes to mitigate this.
Scale quantize doesn’t actually set the notes to the perfect pitch until you move the pitch correction slider. It will move them, though, so watch out. It just determines the reference for quantizing the pitch of notes. By default, it’s using the chromatic scale. For example, set the scale quantize to major and you’ll see the notes jump to a major scale, but they still will keep their pitch offset from the reference note (if a note was 17 cents sharp it’s still 17 cents sharp but maybe with another note for reference). Also, when you drag notes they’ll also now only snap to notes in that scale.
The graph just looks like a large piecewise function and pitch-shifting involves fast Fourier transforms. I noticed that for lines with linear slope at the beginning/end shouldn’t be worried about too much because that’s just you leading/away to/from a note.
Pitch Correction Plugin
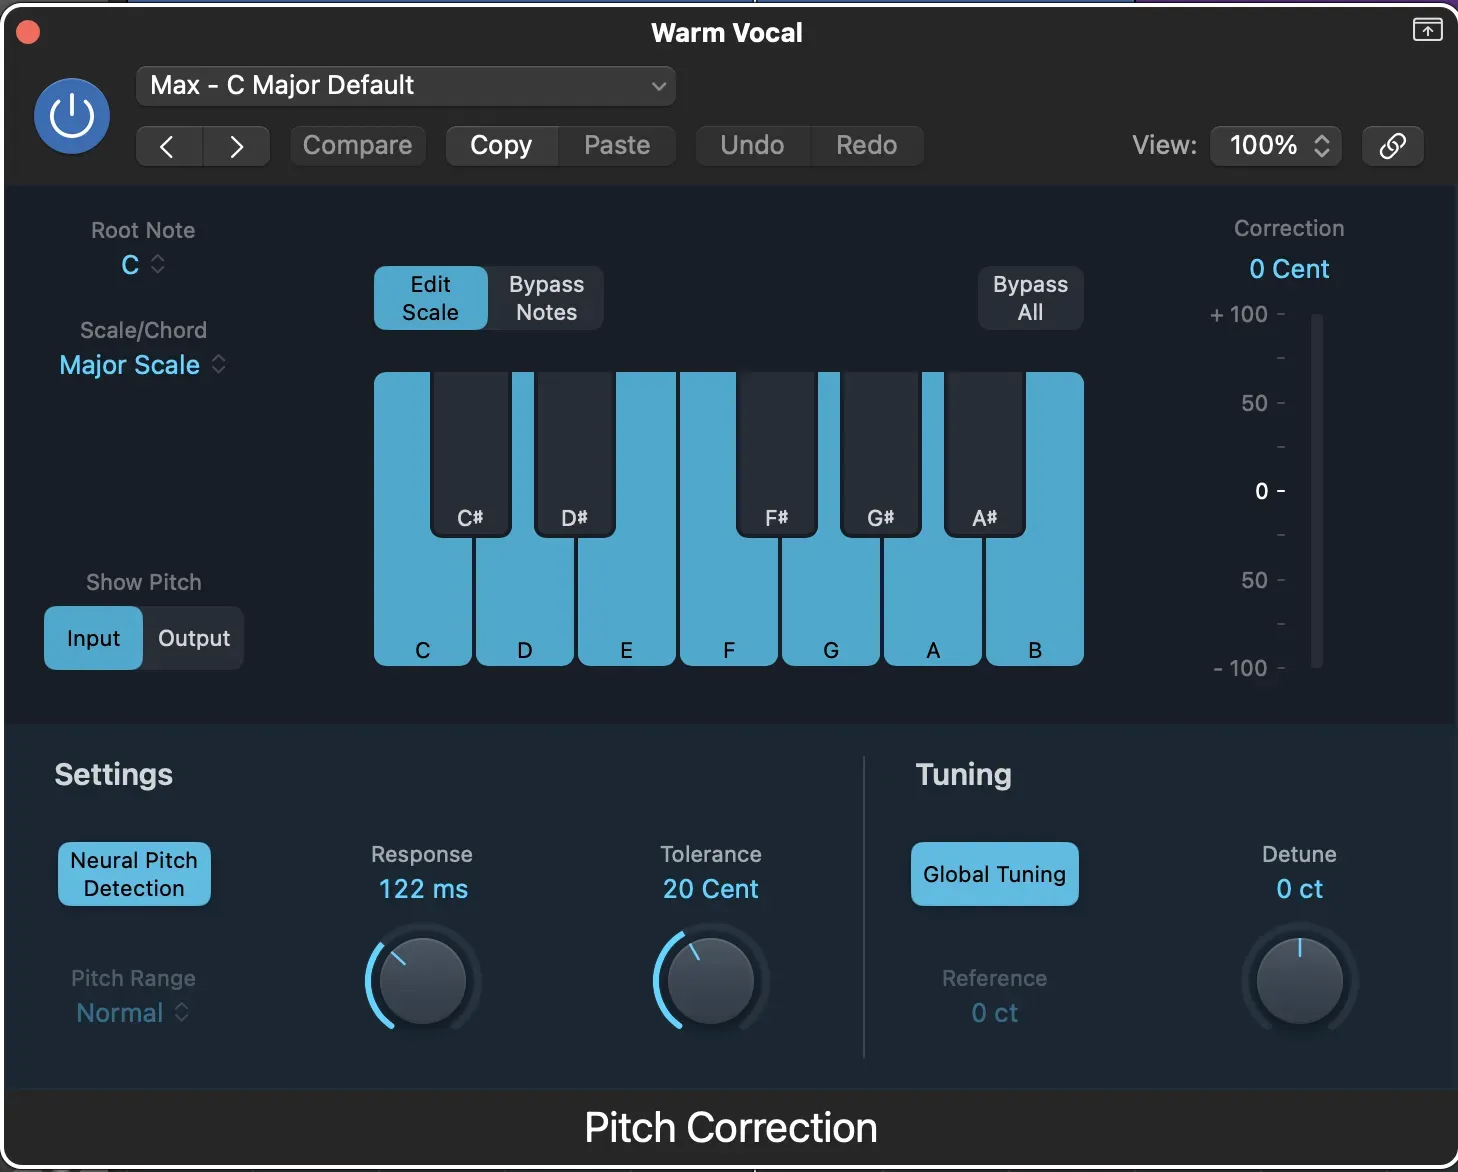
Setting the response and tolerance to 0 will set the plugin in full effect and you can tweak from there. Honestly, it’s all based on feel. For me, a tolerance of around 20 cents and a range of response from anywhere from 100ms to 200ms is usually good.
- Tolerance: how much you can go over/under before the plugin starts to tune the note
- Response: how quickly the note will be tuned
Reverb
Reverb is a time-based effect. This is unlike dynamic/gain-based effects where we usually want those on the directly on the signal to control it. We don’t want our time-based effect aka reverb to take over the signal, rather we want to add just a little bit of it. I really like Logic’s “Airy” reverb effect btw.
We’ll want to create a new channel/bus and send it to that. The benefit is we can also send other vocals to this same reverb! Then, we’ll turn up the send level on the vocal track which determines how much of the original vocal we send to be processed. Since it’s on its channel, we can EQ the reverb. This means the frequencies you EQ out won’t even enter the reverb. So, you’re adding reverb precisely on the frequencies you want.
We’ll EQ out the basic lows and highs. So do a low cut around 500Hz and a high cut around 5000Hz. This gives you much more space in your mix because low/high ends that have reverb tend to cause havoc.
Then the question becomes, do we send it Post or Pre-fader?
Whenever you’re running effects, you can have them run before or after they hit your fader (pre or post). This makes the most sense when we are doing sends. The vast majority of the time you’re going to want to run effects in post-fader mode. For reverb we’d also want to apply it post-fader.
If you apply it pre-fader, any changes you make to the fader will not affect the effect (it won’t affect how much vocal you’re sending to the reverb). If you bring your vocal down, the amount of reverb won’t go down along with it and same thing if you bring it up. It’s rare to do this with reverb. The only use case is if you want some haunting ghostly reverb being left behind while the dry signal fades out or is low.
If you apply it post-fader, any changes you make will affect the effect (it will affect how much vocal you’re sending to the reverb). This makes the effect scale alongside the fader.
If you apply a reverb without a send directly on your vocal, you’re applying it pre-fader since you’re putting it on an insert (don’t do this though). Even though it’s technically pre-fader, you make the determination of the balance of wet/dry on that instrument. Now when you turn the fader up/down it’ll keep the balance. It acts kind of like post-fader but it’s technically pre-fader. This depends on the plugin.
Keeping clarity when applying reverb with sidechain compression
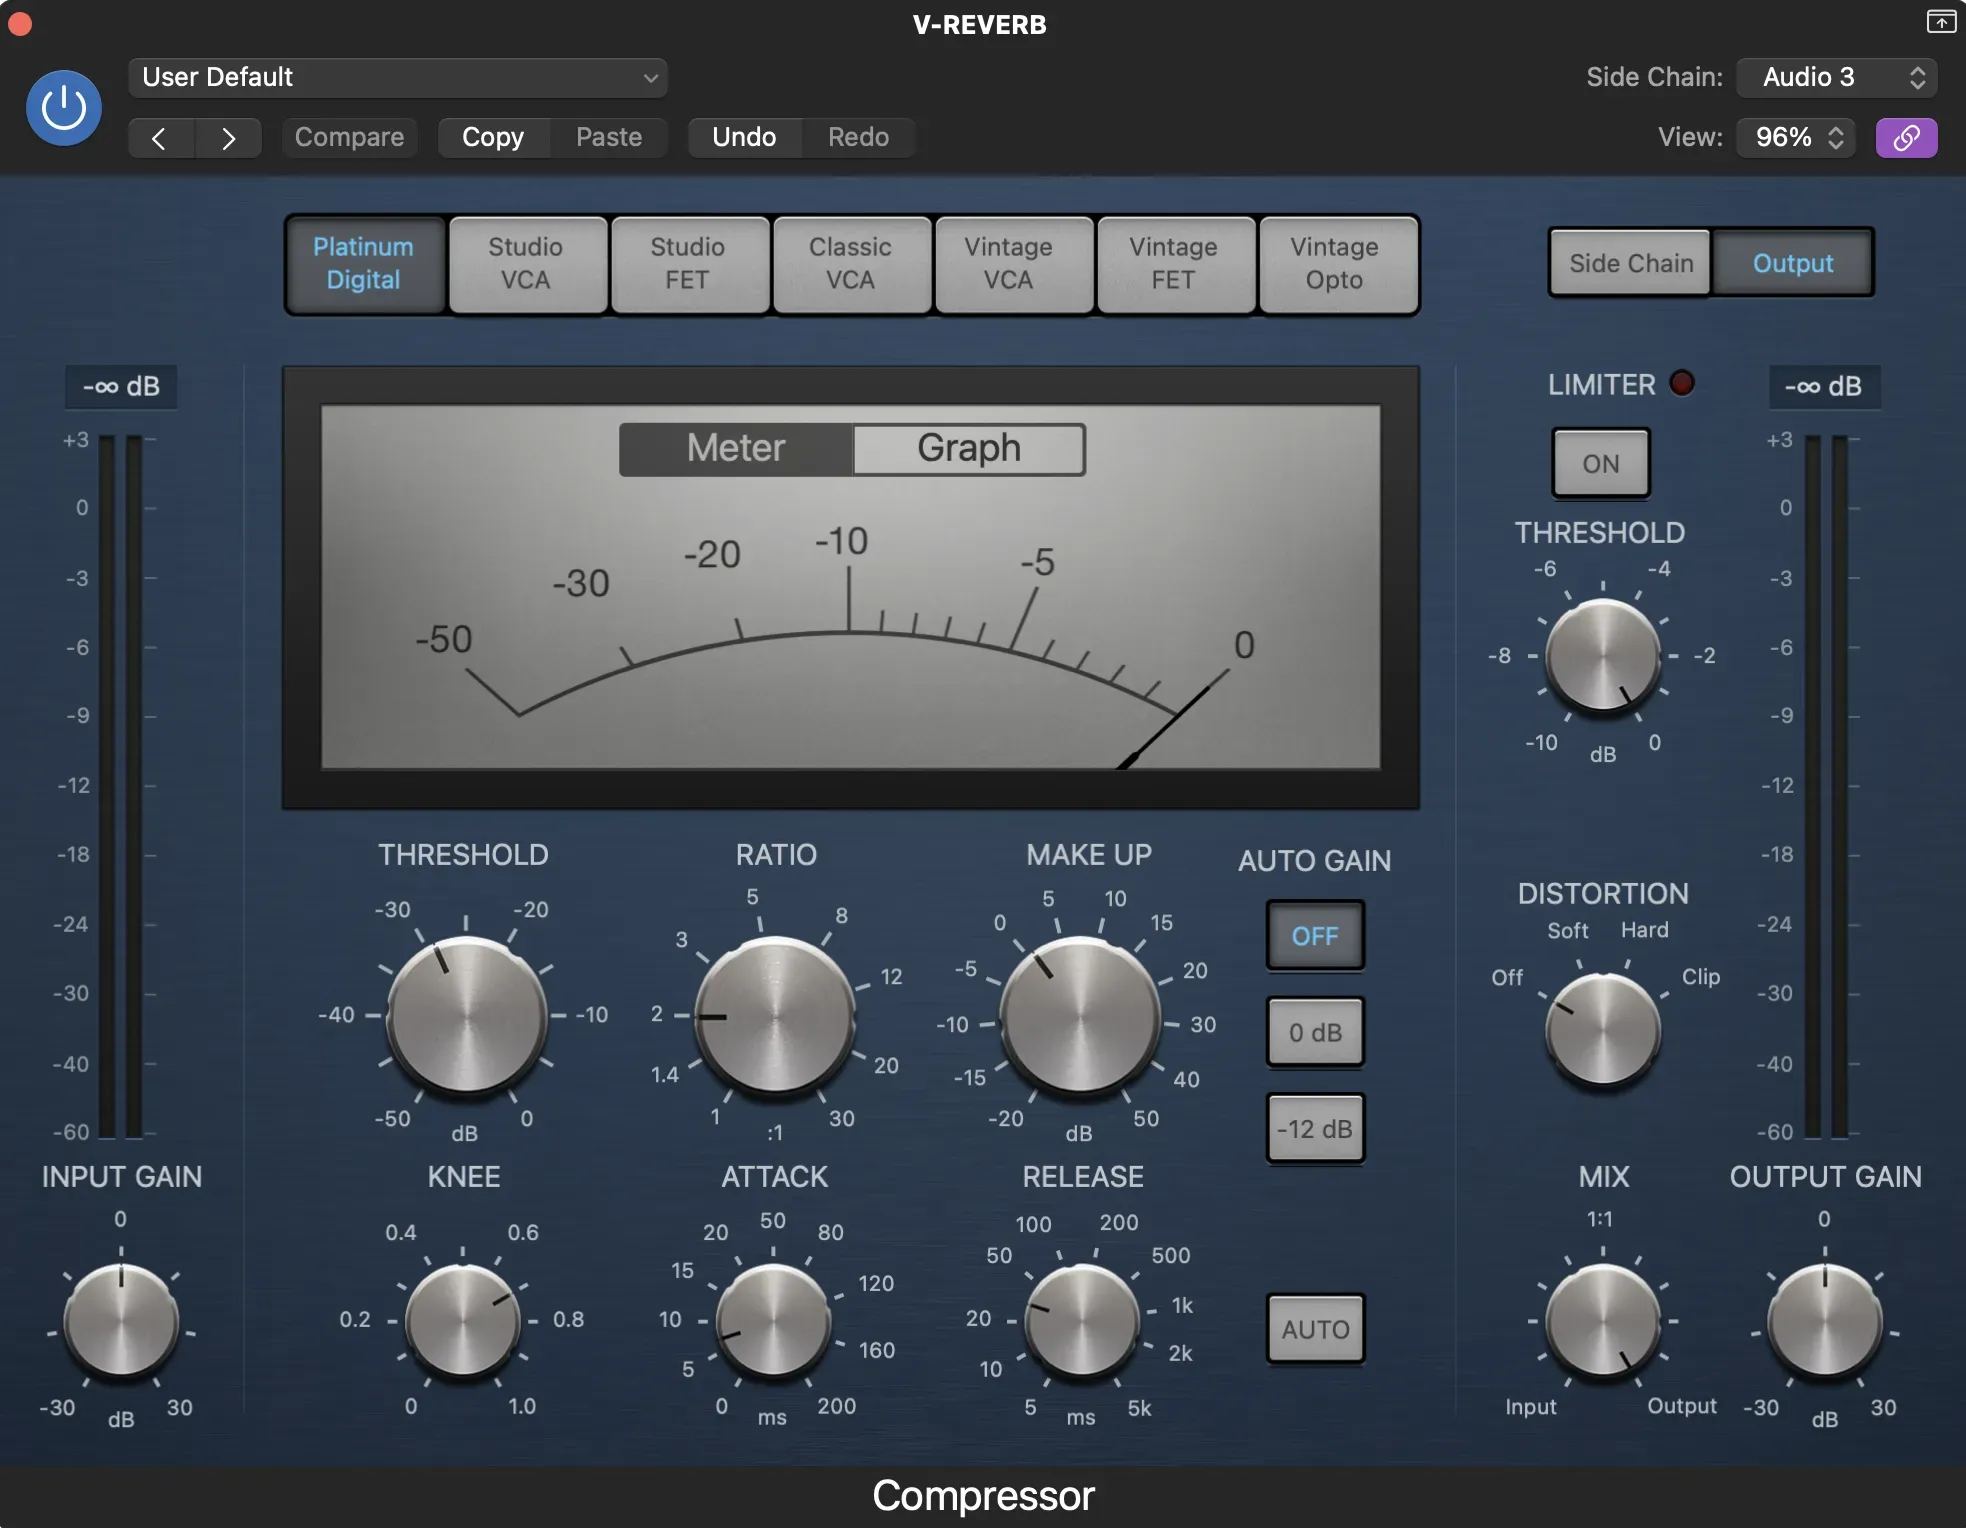
The final step is side-chaining the reverb! Without compression, the reverb kind of muddies up everything in the source vocal. With side-chaining, we can duck the reverb when we’re singing and let it come into play once we’re done singing. We want at least around -6dB of gain reduction. This is more or less what I’m working with (use your ears to mess around, this is just a starting point):
Doubling vocals
Two takes panned left/right
For this technique, you want two takes of your doubled vocals. Let’s say they’re both an octave lower. Then, what you’ll want to do is pan one take to the left and the other to the right. This technique makes the vocal sound wide. For example, you could have two doubles one octave higher, two doubles one octave lower, and then the main vocals.
Harmonies
Panned left/right
You could also do the same technique you use with doubling vocals. This is where you’d take two takes in the same pitch, and then pan them left and right. They’d sit under/below your main vocal.
Character voices
From Charlie Puth’s video on vocals, you can also sing it in kinds of character voices. For example, more open vowels help with blending. Mess around with different distances from the mic as well.
Conclusion
If you take away anything from this article, just know the recording is 80% of the vocal! The remaining 20% is what you’re able to with it in the mix with effects. Keep your eye out for more posts on vocals because there’s so much to learn in this space.